
A tightness test proves whether installation pipework holds pressure, but the exact limits and method come from the current standard and assessment route.
Tightness testing is a core CCN1 skill because it is about proving a gas installation is not leaking before it is left in use. This page is a revision map, not a substitute for IGEM/UP/1B, assessment-centre training or supervised gas competence.
Gas tightness test decision sequence
Use this as a revision prompt for the order of thinking. Live testing still follows the current standard, centre method and competent supervision.
- Identify gas type, installation scope, meter/control position and the procedure being assessed.
- Connect and zero a suitable pressure-measuring instrument at the correct test point.
- Prove no let-by before judging the installation pipework.
- Bring the installation to the required test pressure and allow stabilisation where the procedure requires it.
- Run the timed test under valid conditions and record pressure behaviour.
- If a connected test loses pressure, isolate existing appliances where reasonably practicable and prove the pipework and meter tight.
- Only then assess an eligible existing-appliance loss using the relevant fuel/volume criteria, with no smell of gas.
- If the result is not acceptable, make safe, trace or repair within competence, then retest before returning gas to use.
- Do not replace a tightness test with a smell check.
- Do not skip let-by.
- Allow for temperature and stabilisation effects.
- If appliances cannot reasonably be isolated, the connected test must show no perceptible movement.
- Record the result and the action taken.
This card deliberately avoids live test pressures, timings and limits. Use the current standard, training route and manufacturer instructions for real work.
What the test is proving
The tightness test checks whether the installation pipework and connected fittings hold pressure. It is not a general smell check, and it is not replaced by leak-detection fluid on one joint. In assessment terms, it is a measured proof step before gas is left available to appliances.
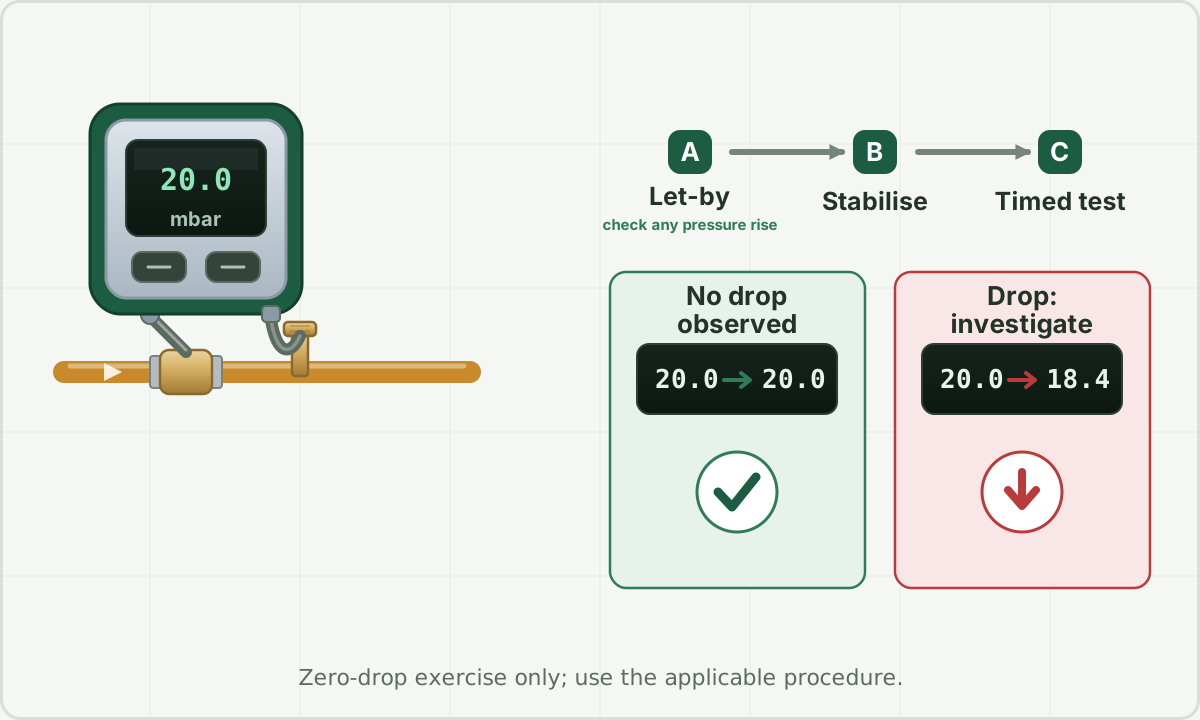
The three ideas to remember
- Let-by: checking whether the emergency control or meter control is passing when closed.
- Stabilisation: allowing pressure and temperature effects to settle before judging the timed test.
- Timed test: monitoring the pressure for the required period and comparing the result with the allowed outcome.
Why the let-by check comes first
The let-by check is not busywork — it protects the whole result. If the emergency control or meter control is passing gas even when it is closed, then any pressure the installation appears to hold could be coming from that leak-through, not from sound pipework. So you prove the isolation is tight before you judge the installation: a control that lets by has to be dealt with first, because until it is, a timed test on the pipework tells you nothing reliable.
Why stabilisation matters
Gas pressure and temperature are linked, so a reading taken the instant you pressurise is not yet trustworthy. Freshly moved gas, a warm meter, or pipework that is warming up or cooling will make the pressure drift on its own — up or down — for reasons that have nothing to do with a leak. Follow the prescribed stabilisation requirements and check the actual conditions: an elapsed minimum does not prove that continuing thermal drift has stopped. Later temperature changes still need attention; do not accept an unexplained rise or subtract an invented temperature correction.
What the assessor is really testing
The number at the end is only part of it. Assessment is looking for the whole safe decision: connecting and zeroing the instrument correctly, proving let-by, allowing stabilisation, running the test for the right period, and — crucially — knowing what to do if the result is not acceptable. A candidate who gets a clean reading but cannot explain how they would make the installation safe, trace the leak within competence and retest before returning gas to use has missed the point. Treat every tightness test as two questions at once: is it sound, and am I ready to act if it is not?
Revision sequence
- Identify the gas type and installation scope.
- Connect the instrument safely and zero it if required.
- Prove no let-by before judging the installation pipework.
- Bring the installation to test pressure and stabilise.
- Carry out the timed test and record the result.
- Investigate any connected loss and prove pipework tight before assessing an eligible existing-appliance allowance.
- Apply the appropriate criteria and complete required remedial work, purging and appliance checks before return to use.
LPG and commercial context
Do not assume every gas installation uses the same figures. LPG, medium pressure, installation volume, meter capacity and commercial scope can change the standard or procedure used. That is why this page teaches the decision map, not a table of values to copy blindly.
Common exam mistakes
- Calling a smell check a tightness test.
- Skipping let-by before judging the installation.
- Ignoring temperature or stabilisation effects.
- Using an existing-appliance allowance to excuse pipework leakage.
- Selecting a loss limit from the meter badge alone.
- Using leak-detection fluid as the only proof of soundness.
- Relighting before the installation has been proved sound and purged where required.
IGEM/UP/1B Edition 4: the 2026 changeover
IGEM published Edition 4 in March 2026, with adoption expected as soon as reasonably practicable and an effective date of 1 October 2026. Its publication notice says Edition 3 remains available during the transition and is withdrawn on 30 September 2026.
Check the edition behind a revision table, course handout or saved procedure. Confirm the assessment requirements with your centre and use the applicable standard for the installation. An older timing or permissible-drop table should not be assumed unchanged because the test stages sound familiar.
Pipework first, then eligible appliance loss
An observed loss with existing appliances connected must be investigated. Isolate the appliances where reasonably practicable and retest the pipework and meter. Any perceptible loss in that section fails: an appliance allowance cannot make a leaking pipe joint acceptable.
If it is not reasonably practicable to isolate the appliances, the connected test must achieve no perceptible movement. If the pipework has been proved tight, an eligible existing-appliance loss can be compared with the relevant fuel/volume limit. There must also be no smell of gas; smell or a loss beyond the limit requires remedial action.
The normal pipework test includes the meter. A test from an additional emergency control valve can define a different boundary. Establish the section being tested rather than assuming that the phrase pipework only always excludes the meter.
Why there is no universal permissible pressure drop
Edition 4 assesses an eligible existing-appliance loss using the fuel and installation volume after the pipework has been proved tight. A U6 or U16 capacity badge is not the installation volume and cannot select the limit on its own. New appliances and installation pipework have no permissible pressure-loss allowance.
For an eligible appliance loss below the smallest permissible limit for its fuel, IGEM says IV need not be calculated solely for that comparison. Where a volume-based comparison is needed, calculate IV and use the applicable table and its conditions. This exception does not remove the separate volume calculation required for purging.
Read a result as evidence, not just a number: were the correct instrument, test pressure, stabilisation and timed period used, and was let-by excluded? A steady display cannot rescue an invalid test. Record the conditions and readings, then compare them with the criteria for that exact test before deciding the action.
Purging needs its own volume calculation
For purging under Edition 4, calculate installation volume and determine purge volume as PV = 1.5 × IV. This applies even if an earlier tightness comparison did not require IV. The calculation gives a quantity; it does not replace the full purge method, permitted discharge arrangement or completion checks.
Worked revision example: an established IV of 0.014 m³ gives PV = 0.021 m³, or 21 litres. A familiar meter badge, a remembered purge time or early gas odour does not establish delivery of that calculated quantity.
Tightness testing is required immediately before purging into service. Taking components permanently out of service is a separately identified exception. Complete the applicable appliance and recommissioning checks before handover: a tightness pass is not an overall appliance safety certificate.
A meter reading is not a tightness test
The meter index measures gas volume passing through the meter. A tightness test measures pressure behaviour under controlled conditions. Watching a meter or smart-meter display stay still does not establish that the installation has passed a tightness test.
Gas rating is different again: it uses measured volume over time while an appliance operates to calculate gas use and heat input. Keep the quantities separate in revision: volume for the meter index, volume per hour for gas rate, and pressure change over the specified period for tightness.
Quick answers
What are the stages of a gas tightness test?
In revision terms: establish scope and valid setup, complete the prescribed let-by, stabilisation and timed test, then apply the criteria for the section tested. Investigate connected losses and prove pipework tight before assessing any eligible existing-appliance loss. Repair or make safe and retest unacceptable results.
Can a small pressure loss be accepted with appliances connected?
Only where the procedure allows an existing-appliance loss after the pipework has been proved tight, using the relevant fuel/volume limit and with no smell of gas. If appliance isolation is not reasonably practicable, the connected test must show no perceptible movement. New appliances and pipework have no permissible loss.
Is a tightness test a legal requirement?
Gas work must be left safe and compliant. Tightness testing is a core method for proving an installation is sound before it is returned to use.
Can I use this page as the live test procedure?
No. Use the current standard, manufacturer instructions, centre training and competent supervision for live gas work.
Which test shows the meter regulator is set correctly?
Supply-pressure checks at the appropriate meter test point assess standing and working pressure against the applicable requirements. Tightness testing answers a different question. An abnormal supply pressure needs investigation through the responsible meter or network provider; it does not authorise adjustment of a sealed regulator.
Does a stationary gas meter prove there is no leak?
No. The meter index or smart-meter display is not a pressure test. Installation tightness must be assessed using the applicable test procedure, suitable equipment and its acceptance criteria.
Something wrong, unclear or out of date? Report an issue with this guide.